*cuties in this context refers to frontend engineers
A couple of days ago, I finally got the motivation to learn about Docker and containerization. I used Docker docs, Stackoverflow, NetNinja’s crash course on YouTube & sprinkles of GPT.
Let’s define some terms real quick.
An image is a blueprint for a container. It stores the runtime environment, application (source) code, dependencies, extra config files (like env variables) and commands. The components of an image are essentially known as layers. Images also have their own file systems (This will be further explained later).
A container can be defined as a package (or box) that contains everything an app needs to run. It contains the dependencies, runtime and the source code. Containers are quite similar to virtual machines but containers are more lightweight and quicker to set up. Containers can simply be defined as runnable instances of images.
Volumes are persistent data stores for containers, created and managed by Docker. Volumes allow you to map folders in the base computer file system to the Docker file system.
Okay? So what next?
The next thing you have to do is to create an image. Remember the layers of an image?
Here’s a visual representation so it makes sense:
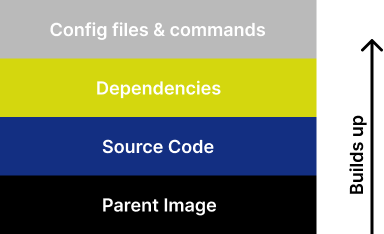
The parent image is basically your preferred runtime for the project. For example: A react project will require a node runtime and a FastAPI project will require a python runtime. You don’t need to build the parent image, Docker provides that for you from their online repo (something like NPM and Yarn) known as Docker Hub. All you have to do is signify what version of the runtime you need and that will be added to the image.

You identify the version of the runtime that works best for your project and assign a Linux distro you want it to run in (Alpine is one of the lightweight distros and it works perfectly in most cases). To see other distros, click here.
Alright, how does everything come together?
After setting up Docker Desktop, you need to create a Dockerfile in the root of your project. I’ll use the same example NetNinja (link) used. Look at this simple Node app.

*.dockerignore works like every ignore file that exists in this life
This is what the Dockerfile contains
  FROM node:16-alpine
WORKDIR /app
COPY package.json .
RUN npm install
COPY . .
EXPOSE 4000
CMD [“node”, “app.js”]
Yoo, how did we get here? What is 4000 and why are we exposing it?
I’ll explain. You remember layers in Docker images work? That’s how this works. Each line kind of represents a layer. Let's go line by line:
FROM node:16-alpine
Here, we are configuring the base image/runtime
WORKDIR /app
Remember when I mentioned earlier that images have their own file systems? Well, this layer sets up the working directory for the image. All files and dependencies will be stored here.
COPY package.json .
The package.json file is copied into the root of the working directory (I believe you know what a package.json file is if you’re reading this article). The COPY command requires you to define the source and the destination and in this case, the source is package.json and the destination is the root of the working directory (.)
RUN npm install
The RUN command runs at build time. This layer adds the node_modules to the root of the image’s working directory i.e adding the dependencies.
COPY . .
Here, we are just copying the remaining files that exist in the root of the project to the root of the image.
EXPOSE 4000
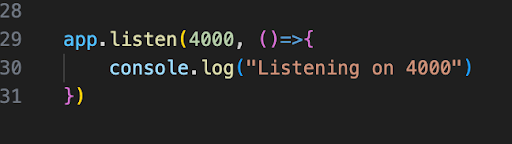
The app currently runs on port 4000 so it needs to be exposed. This allows the app to be accessible from the host computer on that port.
CMD [“node”, “app.js”]
The CMD command runs when there’s a running instance of an image (a container). This command in particular starts the node app.
Well, that makes some sense. We have the Dockerfile, is that all?
Of course not, we need to create the image based on the Dockerfile.
Run this command in the terminal:
docker build -t node_app .
- node_app is the tag name
- the . points to where the Dockerfile is located
If the command runs successfully, you should open your Docker desktop and see this.
(If it didn’t, ✨debug✨ my software engineer)

Congratulations, you now have your first Docker image.
Done, what next?
Now you need to create a runnable instance of the image i.e a container.
The base command looks like:
docker run --name [container name] [image name]
Using our current setup, it would look like this:
docker run --name node_app_container node_app
This will start the container but you won’t be able to access your app. This is because you didn’t forward your port. The EXPOSE command made port 4000 available but we need port forwarding to the browser. For port forwarding, we need the -p flag.
The updated command will look like this:
docker run --name [container name] -p [port in the browser]:[port from Docker] [image]
Using our current setup, it would look like this:
docker run --name node_app_container -p 4000:4000 node_app
And now you should be able to access your app on http://localhost:4000/ 🎊
Fantastic stuff. One small issue though, I am making changes to my files in VS code and nothing is changing on the localhost. Is something broken?
This is why we have volumes in Docker.
As already explained earlier, volumes allow you to map folders in the base computer file system to the Docker file system. (You can check the docs for a more extensive definition)
Before we add volumes, we need to make some edits to the Dockerfile
(Yes, that means we have to delete the image and container we just created)
You can delete the image and container from Docker desktop (it’s pretty intuitive) or we can use the terminal.
To delete a container:
docker container rm [container name]
To delete an image:
docker image rm [image name]
Now to update the Dockerfile:
    FROM node:16-alpine
RUN npm install -g nodemon
WORKDIR  /app
COPY package.json .
RUN npm install
COPY . .
EXPOSE 4000
CMD [“npm”, “run”, “dev”]
We also don’t have a dev script in the package.json. Let’s update that too:
“dev”: “nodemon -L app.js”
Now we are all set up, rerun the command to create the image (scroll up if you don’t remember) and let’s continue
Volumes are set by using the -v flag. The command will now look like this:
docker run --name [container name] -p [port in the browser]:[port from Docker] -v [absolute path]:[Docker working directory] [image name]
Your command should look like this:

*I put the double quotes so that the path is passed as a string to prevent errors
N.B: Instead of using the absolute path, you can also use $(pwd) just like this:
docker run --name [container name] -p [port in the browser]:[port from Docker] -v "$(pwd):[Docker working directory]" [image name]
Your command should look like this:

Much much better, yeah?
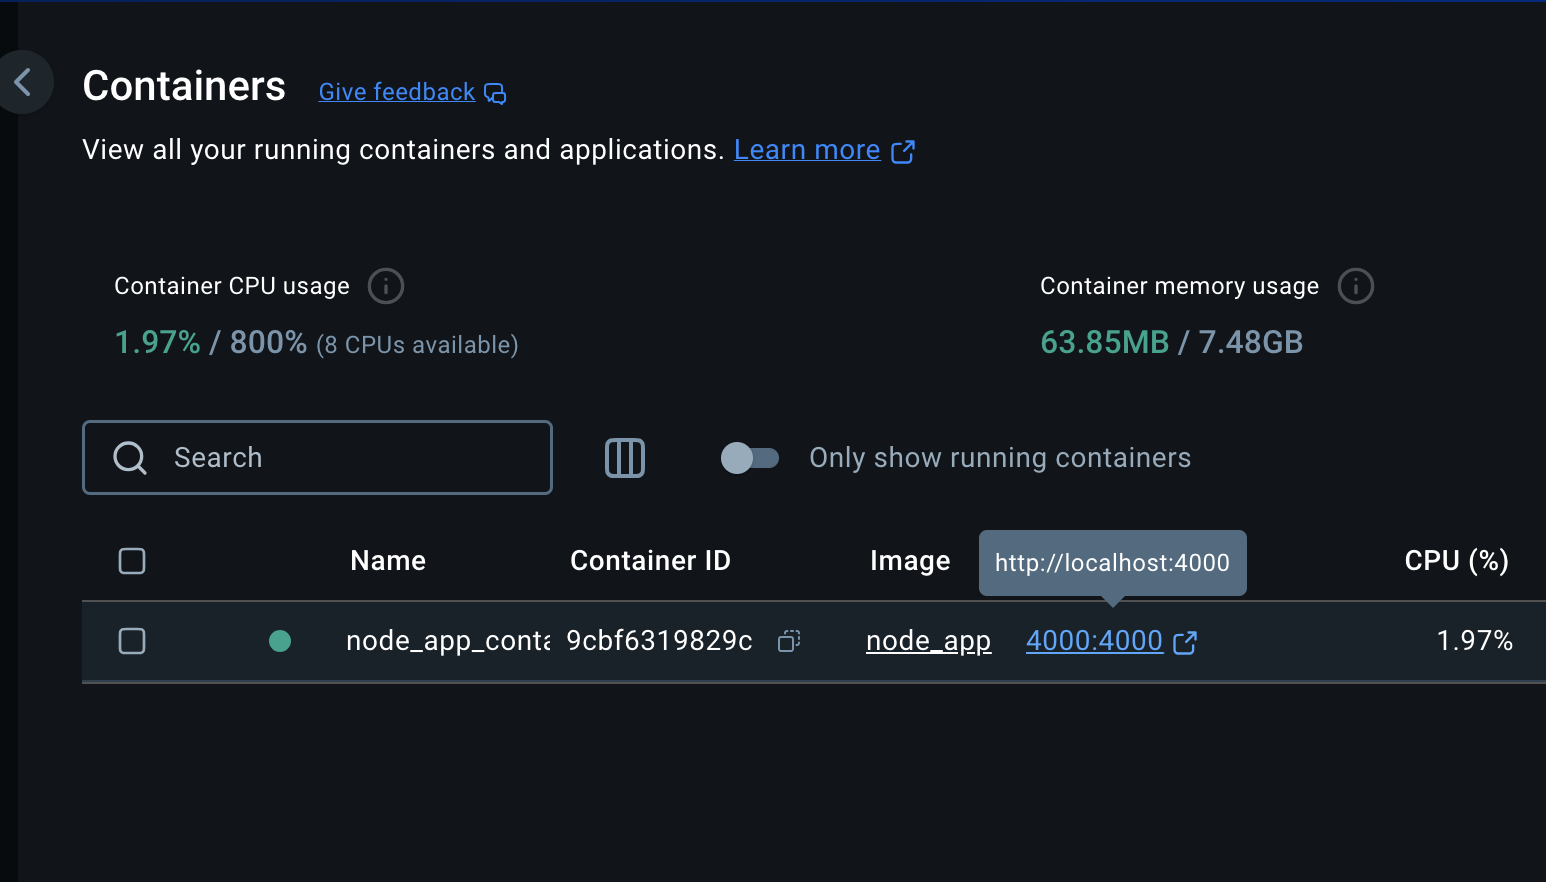
After running this command, you should have your container running and the node app can be accessed on http://localhost:4000/. Also when changes are made to the files in VS code, it reflects.
Congratulations, you just containerized your first app. You can now put Docker in your resume (You fraud 🙂)
The Containers section of your Docker Desktop should look like this now
Before you go, there are a few extra commands to take note of:
- Get existing images:
docker images - Get all container:
docker ps -a - Remove all images, containers and volumes:
docker system prune -a
This is the first part of a two-part series. I’ll be talking about Dockerizing a React App and how Docker Compose works.
WATCH OUT FOR PART TWO!
Remember:
Don't let that backend engineer intimidate you anymore, you know Docker now. You're enough and you matter ❤️.
(Once again, shout out to my 🐐, NetNinja)